January 7, 2024

Deployment of VMware Aria Automation Deployment 8.12 with Easy Install

VMware Aria Automation Deployment and Configure- 8.12


Basic Overview :


The architecture of vRA 8.1 has been completely changed from the previous version 7.6. vRealize Automation 8.1 runs on Photon OS, with a broadly leveraged microservices architecture using Kubernetes and Docker. vRA is comprised of numerous services, running in separate containers, with a PostgreSQL database per container, RabbitMQ serves as the message broker.

Using VRA Easy installer ISO, we can deploy – vRealize identity manager, vRealize Suite Lifecycle Manager, and vRealize Automation.


With vRealize Easy Installer, You can:Install vRealize Suite Lifecycle Manager:

* Install vRealize Suite Lifecycle Manager
* Install a new instance of VMware Identity Manager
* Install a new instance of vRealize Automation
* Register vRealize Automation with VMware Identity Manager

Let's Discuss about - vRealize Automation (VRA) , vRealize Lifecycle Manager (VRLCM) and vRealize Identity Manager (VIDM)

vRealize Life Cycle Manager: – VMware vRealize Suite Lifecycle Manager delivers a comprehensive, integrated product and lifecycle management solution for VMware vRealize Suite.


vRealize Identity Manager (VIDM): – Identity Manager is integrated into the vRealize Automation appliance and provides tenant identity management. Identity Manager synchronizes with the Active Directory domain.

vRealize Automation (VRA) (New name – VMware Aria Automation): –VRA is a modern infrastructure automation platform with event-driven state management. It is designated to help organizations control and secure self-service multi-cloud with governance and DevOps-based infrastructure delivery.


Now Let's Discuss vRealize Component :


1.Cloud Assembly : VMware Cloud Assembly™ is a multi-cloud provisioning service that provides a cloud API layer utilized by the templating engine. Cloud Assembly also supports powerful custom extensibility frameworks, including the serverless function Action-Based Extensibility (ABX), VMware vRealize Orchestrator workflows, and event-broker subscriptions.

2. Code Stream : Code Stream automates the application and infrastructure delivery process with release pipeline management, including visibility and analytics into active
pipelines and their status for troubleshooting. It allows DevOps teams to leverage existing tools and processes with out-of-the-box integration.


3. vRealize Orchestrator : vRealize Orchestrator simplifies and automates complex data center infrastructure tasks, delivering consistent remediation of issues, extensibility and fast service delivery.

4.Service Broker : Service Broker aggregates content from multiple resources and platforms, including Cloud Assembly, vRealize Orchestrator, and native public clouds, into a common catalog accessible via a graphical interface or APIs. It provides a self-service model with flexible, policy-based governance to regulate service and resource consumption.

5.vRealize Automation SaltStack Config : SaltStack Config can easily define optimized, compliant software states and enforce them across your entire environment—virtualized, hybrid or public.

Resource Requirement for the Deployment of VRA , VIDM and vRSLCM .


Network Requirements:

* vRealize Automation requires:Single, static IPv4 and Network Address
* Reachable DNS server set manually
* Valid, Fully qualified domain name, set manually that can be resolved both forward and in reverse         through the DNS server

Requirement for Ports for Product and Integration Communications


Refer  VMware document for required 
 :Ports and Protocols Requirements 

Deployment Process :

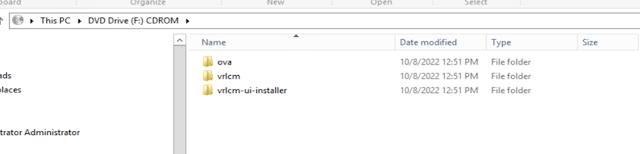
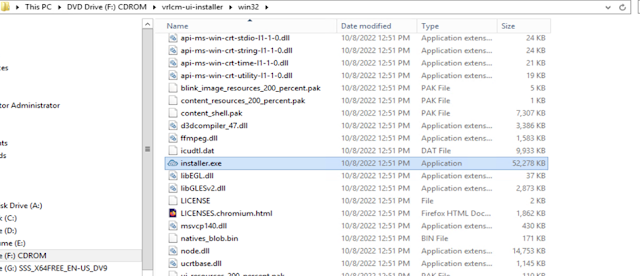
1. First Download the Easy installer ISO which contain VRA,VRSLCM and VIDM bundle .
2. Mount the vra-lcm-installer-xxx.iso image on the local system and navigate to the installer file location.


3.Run the appropriate installer file (OS-dependent) within the folder to start the Installation Wizard,If you are using windows OS then navigate to win32 folder and run the installer.exe.


4. Once you will run the installer.exe file it will give you 2 option one is intsall and second one is Migrate .As we are doing the fresh installation ,Click Install on vRealize Easy Installer for vRA and VIDM.


5. First page after run the install setup you can see the introduction page about the VMware vRealize Automation (vRA) ,vRealize Suite lifecycle manager (VRSLCM) and VMware Idendity Manager (VIDM).


6. Read the End User licensing agreement and check “I accept the term of licensing agreement” and do Next.


7.Next we have to specify the vCenter Details (IP/FQDN & credentials) where you want to deploy the Appliances .


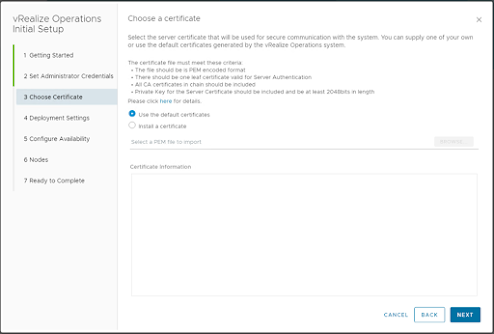
8. It will pop up for certificate warning, Click Accept to continue.


9. Now we have to choose the inventory location like on which folder or cluster and Datacenter will deploy .


10.Next choose the Compute resource from where these appliance can use CPU and Memory resource .


11. Select Datastore from the storage location and if you want to provision thin provision the check “Enable Thin Disk Mode” as per your requirement and Click next


12.Now Most important , We have to specify the network details .Move to Network Configuration and Click Next .
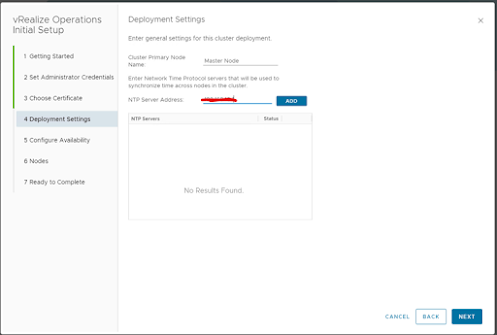
Network configuration ( IP Assisment,Subnet mask ,gateway and DNS Details.)


13. Configure a common password for all the products included in the installation and click continue.


14. Configure Life Cycle Manager virtual machine name, IP, hostname, and click Next.


15.Choose new Install New Identity manager (Incase already if you’re using VIDM in env, you can use existing VIDM; you can choose the import existing option), and specific username (after deployment, you need to login to VRA using an admin user account.


16.In the vRealize Automation Configuration window, you have option to choose the deployment type as Standard Deployment (Single Node) or Cluster Deployment (3 Nodes). In our scenario, we choose the standard deployment.
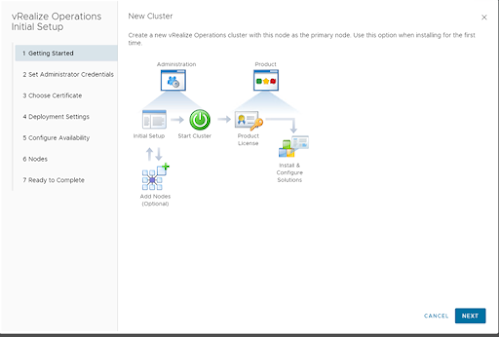
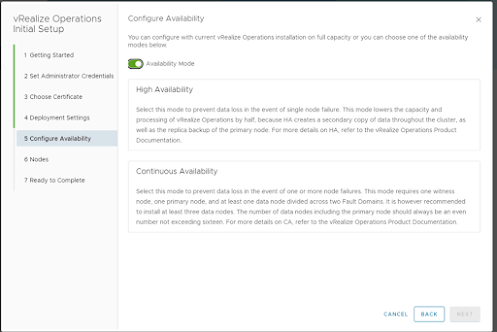
(If you want HA, you can choose cluster deployment)> Next.

* Also ,Configure the Environment Name, License key, vRAs node Name, IP and Hostname and Click Next.


Same page you will get advanced configuration where you can configure for k8Cluster IP range and k8S service IP range.


17. On last Summary page review all the details and submit to start the deployment .


18 .Monitor the installation progress from below Installation Process windows.
It will take some time to complete the deployment .


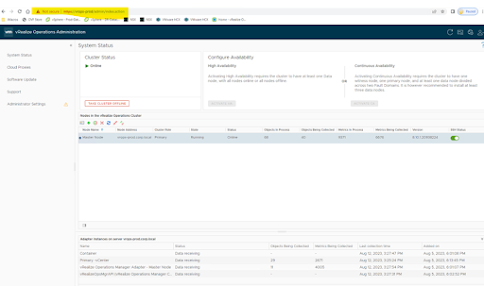
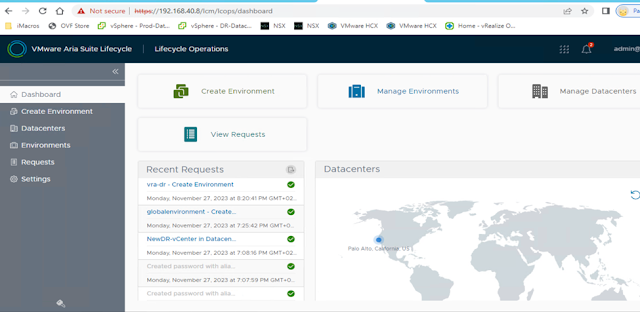
19.Once the installation is finish and LCM is deployed you can access it from the IP / FQDN and check the progress of the other component in detail.


Now we can able to access the LCM and configure the Environment .


1. Login to the LCM with admin@local as local user and password you have used in the deployment stage.


2.Select the Lifecycle manager operation ,you can also use the locker option to set the admin and root password vRealize suite component.


3.You can also login to VMware Aria Automation and VMware identity manager that everything is deployed successfully .

4.Go to browser and provide IP/fqdn of VMware Aria Automation and go to Login page .


5.Provide the username and password which you configured during deployment process .


6.Once you will login to page you can see the different services under My services .Validate all services is accessible for you to perform further process .


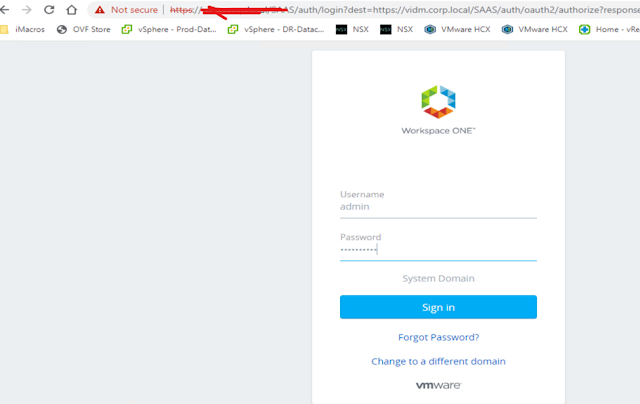
7.Now you can go to browser and provide IP/Fqdn detail of VIDM and login with admin and password.
Once you will be able to login you can integrate VIDM with Active directory or LDAP to syn user from domain .


Hope This post will helpful for the deployment of VMware Aria Automation .Thank you for Reading this Post .


December 27, 2023

Enable the ESXi Side-Channel-Aware Scheduler (SCAv1) or the ESXi Side-Channel-Aware Scheduler v2 (SCAv2) in ESXi 6.7u2 (13006603) or later


Implementing Hypervisor-Specific Mitigations for Microarchitectural Data Sampling (MDS) Vulnerabilities


Before Applying SCAv1 and SCAv2 to ESXi Hypervisor ,Let's discuss about MDS and What is Goal of this Article .

Purpose :

In this Blog  will explain the Hypervisor-Specific Mitigation enablement process required to address Micro-architectural Data Sampling (MDS) Vulnerabilities identified by CVE-2018-12126, CVE-2018-12127, CVE-2018-12130, and CVE-2019-11091 in vSphere.

The release of vSphere 6.7 Update 2 brought with it a new vSphere CPU scheduler option, the Side-Channel Aware Scheduler version 2 (SCAv2) or “Sibling Scheduler.” This new scheduler can help restore some performance lost to CPU vulnerability mitigations, but also carries some risk with it..

CPU vulnerabilities are security problems that exist in processors delivered by major CPU vendors. They’re particularly serious because these problems may allow attackers to bypass all of the other security controls we’ve built up in our environments.

To prevent present in vulnerabilities like Spectre, Meltdown, L1TF, and MDS,we have few new sets of instructions provided by the CPU vendors using microcode that ship as part of ESXi or is shipped in vendor firmware updates.

So What is L1TF and MDS vulnerabilities ?

L1TF :The L1TF vulnerability exposed a problem where processors can leak information between two threads on a core in an Intel CPU.

MDS :The MDS vulnerability can also allow processes to leak information between processes,Intel has disclosed details on a new wave of speculative-execution vulnerabilities known collectively as “Micro-architectural Data Sampling (MDS)" that can occur on Intel micro-architecture prior to 2nd Generation Intel® Xeon® Scalable Processors (formerly known as Cascade Lake). These issues may allow a malicious user who can locally execute code on a system to infer the values of data otherwise protected by architectural mechanisms.

There are three schedulers to choose from in ESXi 6.7 Update 2: the default, SCAv1, and SCAv2

1. Default Scheduler : In default scheduler it should be assumed that all workloads running on a host with the default scheduler can see each other’s data.

2.SCAv1 :Its  implements per-process protections which assist with L1TF and MDS and is the most secure but can be the slowest.


Availability :
- ESXi 5.5,6.0,6.5 and 6.7 release lines
- Does not require Hardware Refresh .


Security :
-Prevents VM to VM Concurrent-Context Attack Vector information leakage.
-Prevents VM to Hypervisor Concurrent-Context Attack Vector information leakage.
-Prevents Intra-VM Concurrent-Context Attack Vector information leakage.


Perfomance:
-Retain up to 100% performance for low to moderately loaded system.
-Retain up to 70% performance for heavily loaded system.
-Does not utilize Hyper-threading.


3.SCAv2 : Its implements per-VM protections but needs considerations for the risk involved in using it.


Availability :
- ESXi 6.7u2.
- Does not require Hardware Refresh .


Security :
-Prevents VM to VM Concurrent-Context Attack Vector information leakage.
-Prevents VM to Hypervisor Concurrent-Context Attack Vector information leakage.
- Does NOT Prevents Intra-VM Concurrent-Context Attack Vector information leakage.


Perfomance:

-Retain up to 100% performance for low to moderately loaded system.
-Retain up to 90% performance for heavily loaded system.
-Utilize Hyper-threading.


Resolution :

Enabling the ESXi Side-Channel-Aware Scheduler (SCAv1) using the vSphere Web Client or vSphere Client

1. Connect to the vCenter Server using either the vSphere Web or vSphere Client.
2. Select an ESXi host in the inventory.
3. Click the Configure tab.
4. Under the System heading, clickAdvanced System Settings.
5. ClickEdit.
6. Click in the Filter box and search forVMkernel.Boot.hyperthreadingMitigation
7. Select the setting by name
8. Change the configuration option to true (default: false).
9. Click in the Filter box and search for VMkernel.Boot.hyperthreadingMitigationIntraVM
10.Change the configuration option to true (default: true).
11.Click OK.
12. Reboot the ESXi host for the configuration change to go into effect.

Please refer the below screenshot for your reference :

Go to ESXi > Configure >Advanced > filter > Mitigation change value in case of SCAv1 


Note : You can also apply this configuration using ESXi Embedded Host Client and ESXCLI for that you can follow the mentioned Kb :


Enabling the ESXi Side-Channel-Aware Scheduler Version 2 (SCAv2) using the vSphere Web Client or vSphere Client

1.Connect to the vCenter Server using either the vSphere Web or vSphere Client.
2.Select an ESXi host in the inventory.
3.Click the Configure tab.
4.Under the System heading, click Advanced System Settings.
5.Click Edit.
6.Click in the Filter box and search for VMkernel.Boot.hyperthreadingMitigation
7.Select the setting by name
8.Change the configuration option to true (default: false).
9.Click in the Filter box and search for VMkernel.Boot.hyperthreadingMitigationIntraVM
10.Change the configuration option to false (default: true).
11.Click OK.
12.Reboot the ESXi host for the configuration change to go into effect.

Go to ESXi > Configure >Advacnced > filter > Mitigation change value in case of SCAv2


Note : You can also apply this configuration using ESXi Embedded Host Client and ESXCLI for that you can follow the mentioned Kb :

Finally below is configuration which we need to apply for ESXi 6.7u2 (and later) Scheduler Configuration :


Thank You ,Hope this Article will help you to decide which vSphere CPU scheduler you have to configure  in production environment as per the requirement .


August 13, 2023

vRealize Operations Manager -Part 2

Installation and Configuration vRealize Operation manager


Stage2: Configure vRealize Operation Manager .


1.First login to browser using FQDN or using IP. You will get screen where you need to choose the installation type:


Express Installation : (Will only ask about license information and move to cluster configuration)

Expand an existing Installation : (This option is used only when you have an existing cluster and this node will be added into it, can be done for multiple reasons). New Installation: It same as Express but when you are going to deploy primary node you have to provide other information.

New Installation: It same as Express but when you are going to deploy primary node you have to provide other Information.


2.In My case I am going to choose New Installation and it will started with below page.


3.In This Step we need to setup the password for admin credentials of vROPS.


4. Now we must provide certificate details if you want to use the custom certificate then browse file and choose the certificate which you created from certificate server. In my case I am going to continue with Default Certificate .


5. This is the 1st node or primary node of the cluster; it becomes the master node. we need to add the NTP address as well.


6. This step is very important if you want to configure High Availability for Primary node. We have two Option here 1. High Availability and 2. Continuous Availability.


High Availability: As name defined you can choose this option for high availability of node means it will prevent data loss in case of node failure. Once you will use this option it will create secondary copy of master node and create replica node.

Continuous Availability: This mode is also help you in case of node failure and to prevent from data loss. but in this node you need one more node called as witness node. This configuration divide across two fault domain which basically need atleast three data nodes .

7.In this step we need to role of node. As this is 1st node it will be master node but if you are going to deploy 2nd node and want to configure as data node then choose Data node you want to configure as witness node.


8.Final step Click on Finish to complete the configuration part.


9.Once you will click o Finish on Last step it will start configuring the nodes and create cluster.


10.Once configuration will finish, it will highlight option to start vRealieze Operations.


11.When we will click on start vRealieze Operations initial installation will start and Cluster will come up online.


12. In Below picture you can see Cluster is running and online .Using above steps you can also deploy other data node and configure in this cluster .


Setup vRealize Operation and configure Data Source .


Basically, you are getting two options to login vRealize Operation Manager:

1.Admin Login: - When you are login to vROPS with admin, you will land to administrator page from where you can upgrade software, cluster status and some other admin status. https://<FQDN_vROPS/admin>

2.Operational login: When you login to vROPS without admin it will land to operational page from where you can perform you all operation task like dashboard, monitoring infrastructure, configure data soure,add cloud end point and lots of other task which you can explore when you will deploy in your environment .

1.Let me show you when we will login vROPS with admin how it will look like , https://<FQDN_vRops/admin>,In Below screenshot in left plane you can see administrator task when you login with admin .


2.Now let’s login without admin option in url: https://<<Fqdn_vROPS>>


3.Now let’s understand what are the steps we need to perform to setup operation page .

4.Login to browser with https://fqdn_vROPS ,First screen you will et is Welcome to configuration and setting up vRealize Operation .


5.In next screen accept the EULA and click Next .


6.Now we have to provide License key that you can also apply later and you can proceed with Evaluation License.


7.Join the CIEP (Customer Experience Improvement Program) and Click Next.


8.Click on Finish to complete the setup.


9.Once you click on Finish it will complete the setup and you are good to configure the Data sources from where vROPS collect the data.

1.Click On Home page and from Left Plane navigate Data Sources. Expand the Data sources option and Navigate to Integration .


2.Once you will click on Integration you will get different Account Types which you can configure. Like vCenter, NSXT, VMC on AWS, etc..

In My case I am going to configure with my on prem vCenter. So clicked on vCenter from below account types.


3.After Click on vCenter it will ask me to provide admin credentials to configure vROPS with vCenter.


4.Once you will provide the administrator credentials, Click in Validation it will validate that provided details is correct or not and is there any issue between connectivity .


5.When you click on Validate it will ask you to review and Accept the certificate .Review and Click on Accept.


6.In below screenshot you can see connection is successfully validated.


7.After successfully connection we can see vCenter is connected with my vROPS and soon it will start collecting data.


8.Go to Home Page ,Navigate to Operation Overview and you will able to monitor infrastraucture .Cluster ,VMs,any alert,Utilization and lots of other task .For which I will engourge configure your enviorment with vROPS and explore all options .


I hope my blog will help you to undertand vRealize operation Manager and how to setup in your enviorment .