Implementing Hypervisor-Specific Mitigations for Microarchitectural Data Sampling (MDS) Vulnerabilities
Purpose :
In this Blog will explain the Hypervisor-Specific Mitigation enablement process required to address Micro-architectural Data Sampling (MDS) Vulnerabilities identified by CVE-2018-12126, CVE-2018-12127, CVE-2018-12130, and CVE-2019-11091 in vSphere.
The release of vSphere 6.7 Update 2 brought with it a new vSphere CPU scheduler option, the Side-Channel Aware Scheduler version 2 (SCAv2) or “Sibling Scheduler.” This new scheduler can help restore some performance lost to CPU vulnerability mitigations, but also carries some risk with it..
CPU vulnerabilities are security problems that exist in processors delivered by major CPU vendors. They’re particularly serious because these problems may allow attackers to bypass all of the other security controls we’ve built up in our environments.So What is L1TF and MDS vulnerabilities ?
1. Default Scheduler : In default scheduler it should be assumed that all workloads running on a host with the default scheduler can see each other’s data.
Availability :
- ESXi 5.5,6.0,6.5 and 6.7 release lines
- Does not require Hardware Refresh .
Security :
-Prevents VM to VM Concurrent-Context Attack Vector information leakage.
-Prevents VM to Hypervisor Concurrent-Context Attack Vector information leakage.
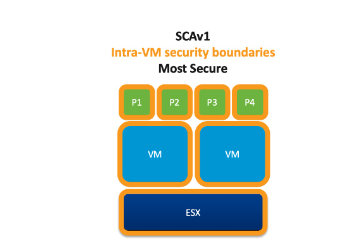
-Prevents Intra-VM Concurrent-Context Attack Vector information leakage.
Perfomance:
-Retain up to 100% performance for low to moderately loaded system.
-Retain up to 70% performance for heavily loaded system.
-Does not utilize Hyper-threading.

Availability :
- ESXi 6.7u2.
- Does not require Hardware Refresh .
Security :
-Prevents VM to VM Concurrent-Context Attack Vector information leakage.
-Prevents VM to Hypervisor Concurrent-Context Attack Vector information leakage.
- Does NOT Prevents Intra-VM Concurrent-Context Attack Vector information leakage.
Perfomance:
-Retain up to 100% performance for low to moderately loaded system.
-Retain up to 90% performance for heavily loaded system.
-Utilize Hyper-threading.
Enabling the ESXi Side-Channel-Aware Scheduler (SCAv1) using the vSphere Web Client or vSphere Client
1. Connect to the vCenter Server using either the vSphere Web or vSphere Client.
2. Select an ESXi host in the inventory.
3. Click the Configure tab.
4. Under the System heading, clickAdvanced System Settings.
5. ClickEdit.
6. Click in the Filter box and search forVMkernel.Boot.hyperthreadingMitigation
7. Select the setting by name
8. Change the configuration option to true (default: false).
9. Click in the Filter box and search for VMkernel.Boot.hyperthreadingMitigationIntraVM
10.Change the configuration option to true (default: true).
11.Click OK.
12. Reboot the ESXi host for the configuration change to go into effect.
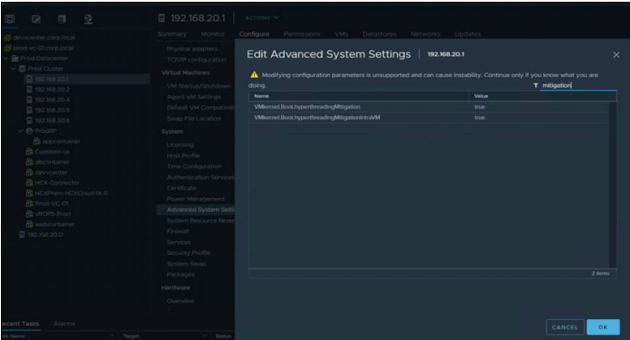
Please refer the below screenshot for your reference :
Go to ESXi > Configure >Advanced > filter > Mitigation change value in case of SCAv1
2.Select an ESXi host in the inventory.
3.Click the Configure tab.
4.Under the System heading, click Advanced System Settings.
5.Click Edit.
6.Click in the Filter box and search for VMkernel.Boot.hyperthreadingMitigation
7.Select the setting by name
8.Change the configuration option to true (default: false).
9.Click in the Filter box and search for VMkernel.Boot.hyperthreadingMitigationIntraVM
10.Change the configuration option to false (default: true).
11.Click OK.
12.Reboot the ESXi host for the configuration change to go into effect.

Finally below is configuration which we need to apply for ESXi 6.7u2 (and later) Scheduler Configuration :

Thank You ,Hope this Article will help you to decide which vSphere CPU scheduler you have to configure in production environment as per the requirement .


