December 4, 2022

Run DR plan in Vmware Cloud Disaster Recovery-Part3


Test DR plan :

Before Testing DR Plan, need to validate VMware Cloud Disaster Recovery Dashboard and everything should be green.

1.System Health

2.Cloud Backup

3.Data Center Connectivity


You can see in Below screenshot all the parameters are showing Green in my environment.


After Validation of Environment, we will move to DR Plan testing.

1.On VCDR console page, Click on Dashboard and navigate to DR (Disaster Recovery) Plan.


2. Choose DR Plan which we have created in Previous Blog. In My case its Example HOL VM DR 
     Plan .


3. After Choosing DR ((Disaster Recovery) plan it will go to summary page of DR (Disaster 
    Recovery).

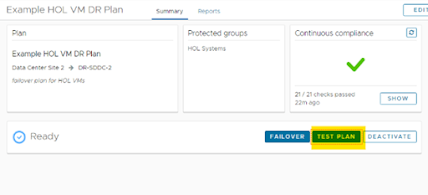
On Summary Page check the compliance status of DR (Disaster Recovery) plan it should be Green,

If Compliance report is not green Click on show and see for which parameter, its showing error and
need to remediate the error.


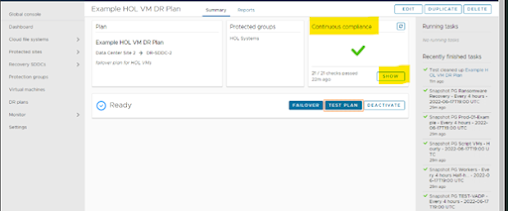
4. Once Compliance report is showing green you are good to Run DR Test Plan .

5. Click on Test Plan.


6. During DR plan failover or test, it is possible to leave the VMs running on the Scale-out Cloud File
    System (SCFS). This approach avoids the storage vMotion to the SDDC vSAN datastore. This can
    speed up DR plan test run completion at the trade-off of not leveraging the full performance and 
    protection of the SDDC vSAN datastore.


7. Once you will Click on Test Plan it will ask you to choose the snapshot using which you want to
    recover virtual machine on recovery Site.


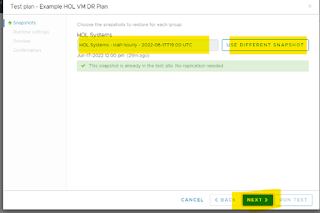
By Default, it chooses the latest snapshot. If you want to proceed with different snapshot, click on USE
DIFFERENT SNAPSHOT.


8. Click on NEXT.

9. In Next screen you will get runtime setting where you can choose different options.

9.1 Ignore all errors.

9.2 Stop on every Error

9.3 Full storage migration to SDDC

9.4 Leave VMs and files in cloud backup.

In test DR run plan it would be great if you will go with Leave VMs and files in cloud backup ,So test plan plan will be more faster .


10. Click Next and Preview all the steps on this page.

11. Once you will complete the preview section. Go to Blank Box on same page and write TEST   
      PLAN  all in Capital Letters.


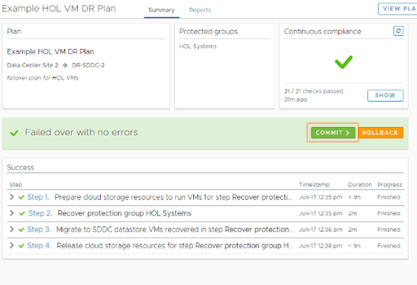
12. Now Click on RUN TEST option to run  Test DR Plan.

13. Once you will Click on Run Test, it will show the Steps which you see in preview section.


14. Once the Plan is successfully completed, Go to Recovery SDDC and Validate the VM from                    vCenter console.

15. After Validation of VM on Recovery Side you must perform cleanup task.

In Cleanup Task It will shutdown the VM which is recovery SDDC side and delete from vCenter
Inventory.


16. Click on CLEAN UP ,It will ask you to type CLEAN UP TEST in Blank box and proceed .


17. At Last you must Acknowledge the task.


18. At the end, you can download the report in PDF format for audit purpose.


Run Actual Failover Plan:


1. On VMware Cloud Disaster recovery console page, Go to DR Plan on Left Bar.

2. Choose DR (Disaster Recovery plan) and check the status should be ready.

3. Go to DR summary page.

4. On Bottom you will get Failover Option.


5. Next ,screen it will show the compliance status for Protected Site and Recovery Site.


6. As same DR plan you will get option to choose different snapshot.

7. You can choose Run time setting as per your requirement.


8. In Next Steps ,need to preview all the steps which will run during failover and Click NEXT.

9. Type FAILOVER back box in capital letter and Click on Start Failover.


10. After the Failover task will complete, Validate all workloads. If you will see any issue if you have
      option to rollback.

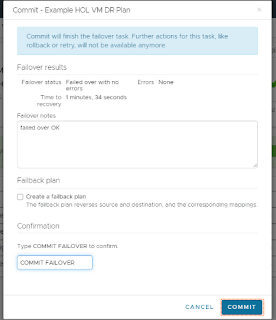
     Else ,you must commit the failover plan.


11. Before Commit you have type COMMIT Failover in Box and click on COMMIT.


Fail Back :

To perform Failback plan you must activate the same DR failover plan which is in in-active state. Once it will activate again it will start the replication from Recovery SDDC to Cloud based File system.

Once you Primary Site /Data center will restore using same steps you can perform failback.


Hope,  Series of VMware Cloud Disaster Recovery Blogs will be helpful to understand the Disaster
Recovery replication process, DR Plan and to Failover Plan to recover your workload on VMware Cloud on AWS SDDC Data center.


September 15, 2022

DR Plan and Inventory Mapping in VCDR- Part2


Disaster Recovery Plan and Inventory Mapping.

Before we will DR Plan First create Protection Group:

Protection Group: 

Protection Group is grouping of virtual machines which will recovered together.

In VMware Cloud Disaster Recovery supports protecting VM’s which is running on any kind of datastore like NFS,vSAN , VMFS or VVols …

Creating Protection group and grouping Virtual machine is helpful when you want to put the VM’s which is dependent on another server. For example, VM1 application is dependent on VM2 database or talking to VM2. If you want to recover both virtual machine as part of one plan and without any delay, then you can put together VM1 and VM2 in one protection group so during recovery they will power on as part of one Plan under one protection group.

Similar Fashion you can prep the application bundling of all VM’s and basis of that you can create Protection group and put in Specific protection group.

Create Protection Group:

1.        1. Go to VMware Disaster Recovery console Dashboard.

  2. In Navigation Plan you will Protection Group, Click on Protection group.


3.      3.  Right Side Corner you will get option to create Protection group, Navigate to Create                                Protection Group and Click.

4. Provide the Name of Protection as per Company standard or Planned name.Next, you must choose          the Protection Site from where you want to Protect VM’s.

 5. Under Group Member ship you can select the VM on basis of VM pattern, Tag, and folder.

E.g.

5.1.If you have List of VMs which name is starting from WIN01, WIN02, WIN03 then you can put WIN in search bar and it will reflect all VM’s Name starting from WIN.

5.2 If List of VM’s is tag with any security or any special tag example oracle then you can search with Oracle, and it will give you list of ALL VM’s which is tag with Oracle.

5.3 If List of VM’s is part of one specific folder like RHEL or RAC or Windows you can search with name of folder, and it will list down the all VM’s under that folder and you can choose VM’s which you want to protect.

 6.  Next You have schedule Snapshot schedule. Means on which frequency snapshot of Protected                will start.

6.1 Standard-frequency snapshots allow you to set snapshots schedules every hour, 4, 6, 8, or            12 hours, daily, weekly, or monthly.

 
6. 2 For High Frequency snapshot will schedule for every 30 minute.


Note : For High Frequency Snapshot you have to check the compatibility matrix like.If vCenter and Host are not compatible then you can not perform high frequency snapshot for protected VM’s.


7.To Use quiesced snapshot, you must uncheck the high frequency snapshot.
8. Click Preview VMs and FINISH.


Configure Inventory Mapping for DR Plan:

1. Network Mapping

2. vCenter and Folder Mapping

3. Compute Resource Mapping

Purpose of this Mapping is that when you will Perform DR activity VM’s or workload will attach with Pre-defined Mapping and using that it will attach with same resource, network folder in destination End.

vCenter Mapping: We have to Map all source vCenter which contains VMs need to be protected by VCDR.

DR Plan has vCenter mapping for the following components:

vCenter Folder

Compute Resource

Virtual Network


1.       Go to VMware Cloud Disaster Recovery Console page.

2.       Navigate DR Plan on Left side Bar and Click on DR Plan.

3.       Once You will click on DR Plan on Top Right Side it will highlight Create DR PLAN option.


4.       Click on Create DR Plan and Name DR as per your industry standard.


5.       In Recovery Site Section you have to choose the existing recovery SDDC which is deployed in Previous discussion.


6.     Next section we have to select the Protected Site, we have to choose vCenter or site where VM’s are running which you want to protect. CLICK Next.

7.  Choose the protection group which you want to associate with DR plan.


8.  Now you have to choose the Protected vCenter and Revery vCenter Mapping.


9. Next is Folder Mapping, Click on Map Folder and choose Folder from Protected site and where 
    you want to recover virtual machine.
    Choose the Folder and Click on ADD .In my case Source Folder is HOL and Destination Folder is
    Workload .


10. Click on Map Compute resource and Map resource from Protected and recovery site .
                                            

11. Next We have Map the Virtual Network ,If you are going to use the streched network the it will
      Same subent on source and destination .In case you want to chnage the Network after recovery
      it will be diffrent .

      In My case ,you can see soource network is VM Network and Recovery side network is DR 
      DR Network after failover .


12. Next is IP address change ,VCDR will not change any ip address ,Recovered VMs Should                    use DHCP or Stretched netwrok .

13. We you want to run any script which you need to be run after failover you can intesrt script 
      using hilighted option using script for VM.

      Select list of VM's where you want to run the insert script .If you do not want
      to run any script the choose do not run any script and Click on Next.
                                          
               
14. If you want to Edit Recovry step the click on EDIT and change in recovery .Like ,Recover all VM's ,if you do not want to power on after recovery you can choose that option also .Its depend on you plan .
                                            

  15. Last you can set alert trigger for every complinace .Click on Configure email alert and
        enter genric mail id .Also from right side check the box for which you want to configure alert.               
                                               
              
 16. Review DR Plan and Click on Finish .


What Next ? :


1.Testing DR Plans and Monitor Failover Process .

2.Failback Plan and Compliance Health Checks .


August 18, 2022

VMware Cloud Disaster Recovery


Most of us already aware about few Disasters recovery solution like SRM, vSphere replication and Zerto to Protect workload (VM's) from Primary Datacenter to Secondary Datacenter.

In these Blog, I want to discuss one of new service launched by VMware for Disaster recovery to protect workload (VM's) between On-Prem Datacenter to VMware Cloud on AWS,which is called as VMware Cloud Disaster Recovery.


VMware Cloud Disaster Recovery (commonly called VMware Cloud DR or VCDR) to protect your vSphere virtual machines (VMs) by replicating them to the cloud and recovering them as needed to a target VMware Cloud Software Defined Data Center (SDDC) on VMware Cloud on AWS.


Service Component in VCDR


1.Cloud Based File System :A cloud component that enables the efficient storage of backups of protected VMs in cloud storage and allows VMs to be recovered quickly, without requiring data rehydration.

2.Orchestrator : This service will provide to automate the disaster recovery process .

3.DRaaS connector : This is virtual appliance which will help to protect VMs using snapshot replication from protection groups.

4.Protection Groups : Protection group where you keep your virtual machine which you want to protect and create regularly scheduled snapshots of VMs which replicate to the cloud file system.

5.Disaster Recovery (DR) Plans : Here you can define the steps required to recover the workload from cloud-based file system to recovery SDDC on VMware cloud on AWS .


In below scetion you can see the component which i explain above and how DRaaS connector connected with SaaS Orchestrator and Cloud based Filed system to protect workload (VMs) .


Now, Let's understand difference between Protected Site ,Recovery Site and Backup Site.

1.Protected Site : Protected Site is where your virtual machine is running primary and which you want to protect and recover on Recovery (Secondary Site ) in case if Disaster hit or any planned activity.

2.Backup Site: Backup Site is Cloud backup where the workload (VMs) is replicated and saved.You can deploy additional backup site also. In case of Disaster or planned activity cloud-based file system on Backup site mount with recovery SDDC as NFS storage recover your VMs.

3.Recovery Site : Recovery Site is where you will recover workload (VMs) during failover action.It comes with two subscription model 1. On-demand 2. Pilot Light.


A) On-Demand : Here, as name already explained that you can deploy SDDC on VMware Cloud on AWS during failover or disaster. It is not Pre-Deployed SDDC on recovery site. Its On-Demand SDDC infrastructure which you can deploy whenever its required .

B ) Pilot Light: Pilot light you can also called pre-deloyed deployment .Its deployed with smaller subset of SDDC hosts to be deployed ahead of time for recovering critical application .